
Yesterday and today I slapped together the box sides for the trailer. I started by building the sides themselves at home. The photo above is the first one test fitted. I couldn't find any neighbours to borrow a power saw from, so I used my trusty Stanley FatMax handsaw, which cuts very quickly and easily (and also has a 90/45 degree beveled handle so it can be used as a square).
 I then went to Heavy Pedal Ranch while everyone was away at school/work and started cutting and welding on the pieces of box beam for the stake pockets. I initially welded just the two sides of each, but Dwayne came home and suggested I weld across the top to keep moisture out from between the pieces, so they wouldn't start to rust out as quickly. As you can see, my welding doesn't suck quite as bad is it did.
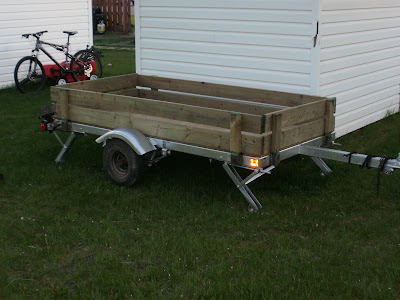
After work today, the base Wood Hobby Club decided to have an open house in conjunction with the reopening of the auto club. I used this opportunity to buy a membership and rip the bottom ends of the stakes to they'd fit in the pockets, since the box beam wasn't big enough to accept a full 2x4. I unscrewed all the planks, ripped the 2x4's with the bandsaw, and reassembled the pieces. The vice-prez of the wood club happened to have some exterior wood treatment, and gave me some to treat the cut ends of the planks, so they should stay nice and rot-free for a good long while.
After this photo was taken I also painted the stake pockets and a few spots that I cleaned up with the grinder where I cut off bits of the original frame.
I'm not sure what colour I want to paint the wood bits yet. I'm thinking maybe forest green? Send me your suggestions. What do you think would look good over the silver frame? Possibly just some clear varnish?
And once again I've gone and lost the reciept. Here's my close estimation..
Last total: $260
--------------------
2 10 foot 2x4's - $2.50 ea
6 8 foot 1x6's - $3.00 ea
-------------------
Subt: $23
-------------------
Total: $283 (though I'm not sure if this lumber really counts since it's not actually part of the camper)
And a bonus for those of you who really have nothing better to look at...

This was my Sunday project. My headlights were very badly faded, and this was irritating me to no end, so I picked up a 3M Headlight Lens Restoration Kit from Canadian Tire, and it worked wonders. One of the guys at work noticed and thought I had installed brand new headlights. This picture doesn't actually show the full effect of the kit. After I did the drivers side light the first time, it was still a bit cloudy. I reread the instructions and saw where it stressed the importance of rough sanding until seeing an even frosted look over the whole lens, which I hadn't done. I redid the light before moving on to the second one and it looked brand new. I wish I had remembered to take another photo. If any of you really want one, I can snap another pic later.
No comments:
Post a Comment