Sunday, June 20, 2010

Painting Finished


I put the second coat of exterior paint on today, then left it for about 1/2 hour to get tacky, and proceeded to start removing some of the masking. I started with the interior (since it was fully cured), and re-installed the cabinet doors. The colours are a little off in this photo, because the yellow walls distort the lighting. Also, the pics were taken with my Blackberry rather than my camera, so that doesn't help.


By this point the exterior paint was tacky enough to remove some of its masking, and I was really anxious to see how the galley turned out, so I peeled off all the tape and garbage bags. I think it looks pretty sharp, although there are a couple of spots where I got paint on the stained wood, so those will have to be fixed. I think I'll try using the #000 steel wool and some varsol to remove the paint, and then I'll touch the spots up with a light topcoat of the Polyshades.

People have been asking me what I have left to do, so I made a list. Here it is.

Saturday, June 19, 2010

Primed

Its starting to look more like a finished product (or a fried egg) all the time.
Sent from my BlackBerry device on the Rogers Wireless Network

Outside and ready to paint.

Sent from my BlackBerry device on the Rogers Wireless Network

Wednesday, June 16, 2010

Inside Paint

Well loyal readers, I've been very busy lately and haven't had a chance to give you an update, until now. These photos are actually a couple days old. They show the first coat of interior paint. There is a second coat in now, and I plan to give it a third for good measure. The paint i'm using is Behr Premium Plus or something like that, and it does a fairly good job of covering the stamps on the plywood, which is something I was concerned about.

The walls also have a nice even texture, because prior to painting I spread a layer of wood filler completely over each wall and then sanded it smooth. This smoothed out the deep grain and imperfections (remember, the walls are good-side-out), without resorting to endless hours of sanding.

The colour, chosen by Laura is called "Spiced Butternut." There is a photo of a room with one wall done in the same shade here. I wasn't too keen on it at first, but I have to admit, it's grown on me. Its a very calming colour (or perhaps I'm biased, being a Psych major and all). The square thing on the floor is one of the cupboard doors, to demonstrate the contrast in the shades.

Saturday, June 12, 2010

Windows

This is what the windows look like.
Sent from my BlackBerry device on the Rogers Wireless Network

Friday, June 11, 2010

Staining

It's been a few days since my last post, and not because I've stopped working on the trailer, but because the work has been so dull that it really hasn't been worth talking about. It's been a week of wood filler and sanding, and most of the time I looked like a sugar cookie. I've said it before, but I'll reiterate.. I hate finish work. Especially paint prep.

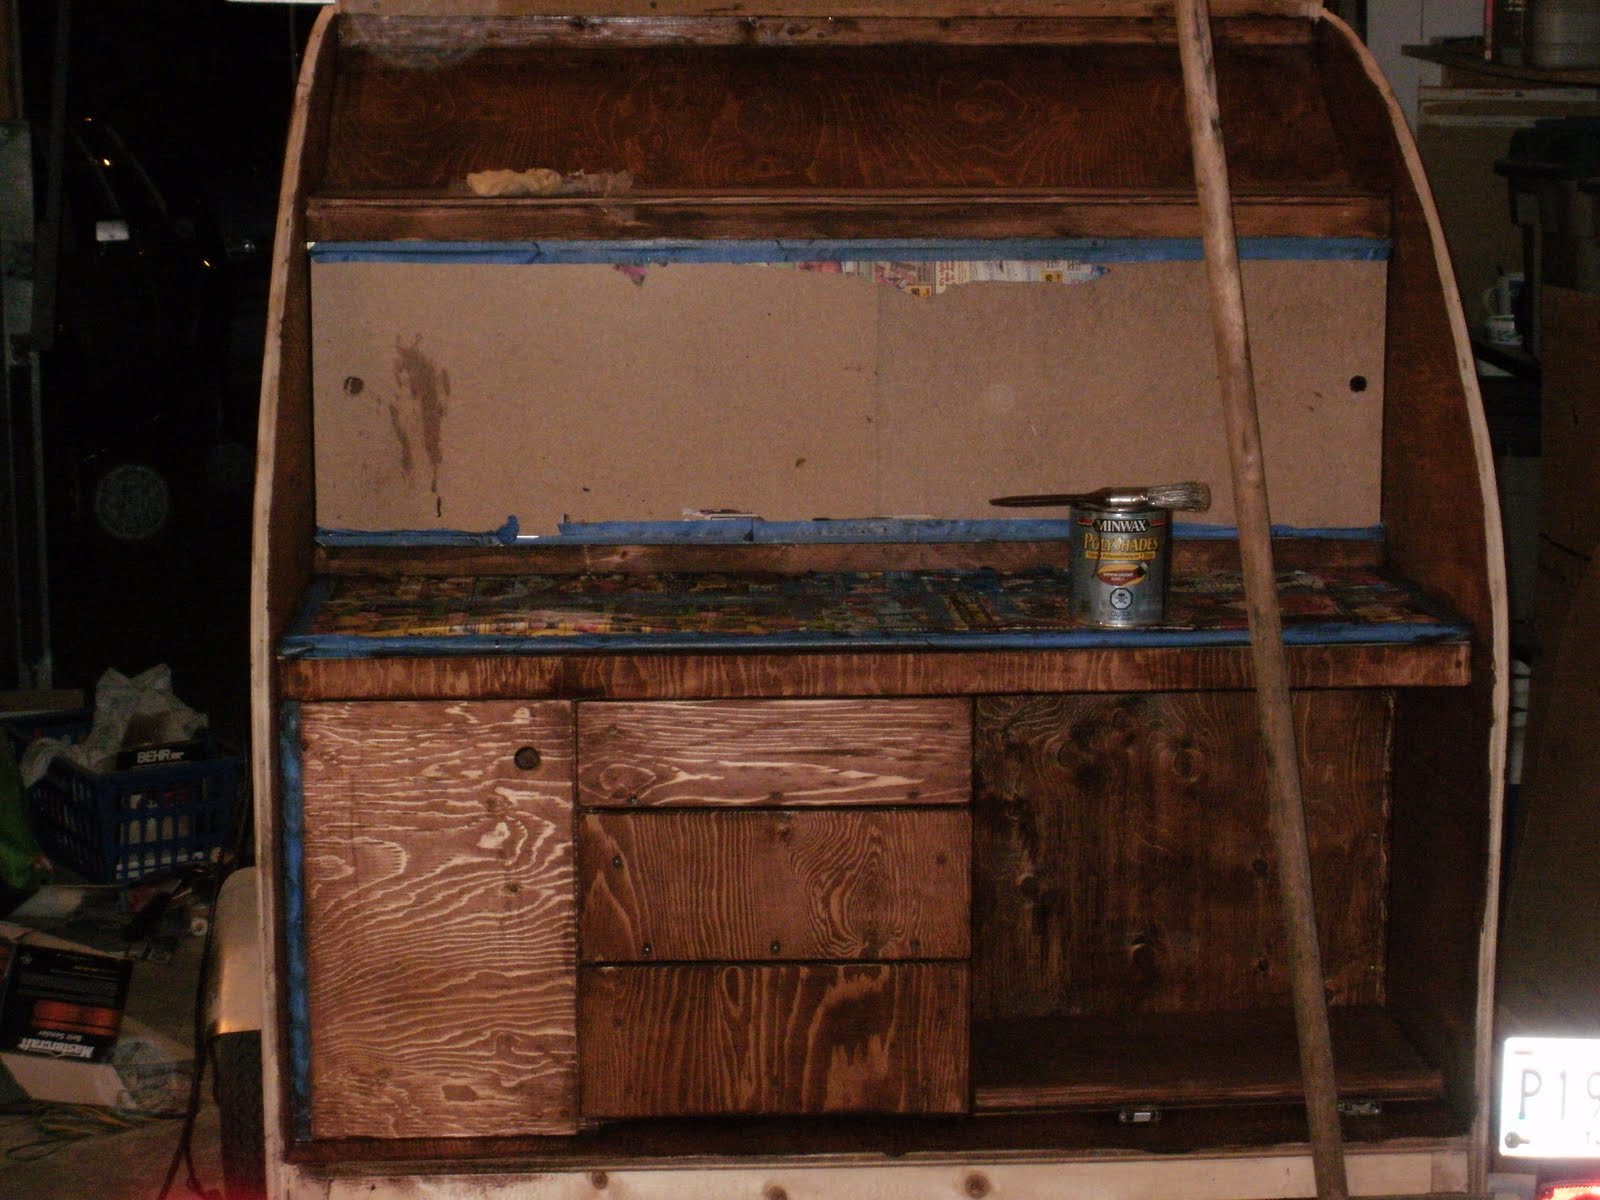
On the bright side though, I finally started staining the galley tonight. I'm using Minwax Polyshades, which is a 2-in-1 stain and polyurethane treatment. For this first coat, I used it like normal stain, painting it on and then wiping it with a rag. This got the colour into the wood, and for the next coat, I won't use the rag. I'll just brush on a thin coat of the product and then leave it to dry. That should give it the nice high gloss, tough finish that is Polyshades' claim to fame.

The photo above really doesn't do the stain justice. I don't know if it was the lighting or what, but the stain looks much better in person than it appears above. Trust me. However, the cabinet door and top drawer did actually turn out a bit lighter shade than the rest of the cabinetry. If I remember correctly, those two pieces were cut from the same sheet of plywood. It seems, for some strange reason, like that particular sheet isn't taking to the stain the same as all the rest. I may need to put an extra coat on those pieces to even them out.

Yes, that is a bit of stain that I dripped on the upper left cabinet sliding door. I'm not worried about it, as the sliding doors will be painted to match the exterior of the trailer (gloss white).


For the cost analysis, I'll add in all the paint supplies now, before I forget how much they were worth. This includes all the sandpaper, varsol, rollers, brushes etc that I got with the paint. Even though it won't all become part of the trailer, I'm adding it in, because almost all of the items are consumable goods. Wayner, I'll leave it up to you whether the full cost of all that stuff should count.

Total Costs to Date:

Last total: $693.22
------------------------------
Paint Supplies: $230
------------------------------
TOTAL: $923


P.S. Someone remind me to take photos of the windows, I just remembered that you all haven't seen them yet.

Monday, June 7, 2010

FML

Sorry loyal readers, but there are no photos for you today. Why you ask? Well, I have reason to believe that my dog ate the micro SD card from my camera. I know it sounds like the old homework excuse, but I’m convinced that’s what happened. I was taking the card out of the camera to upload the photos from yesterday’s trailer work, when Ella the China Shop Bear jumped up and caused me to drop camera, batteries, SD card and all. She then rooted around the rubble with her nose, and as I gathered up all the dropped bits, I found no trace of the memory card. Even if I could find the damn thing after it’s been through her, I’d be surprised if it’s still functional. Not that I’d be that picky about using an 8GB turd to store my photos.

Anyway, down to business. Just because there are no photos doesn’t deny your right to kill time at work reading about my current obsession.

Saturday I didn’t get much done, I built a box to cover the cooler drawer slides where they stick into the cabin, and caulked some of the gaps in the cabin walls. Most of the day was spent retrieving an amazingly complete ’46 Chev 2-ton from a farmer in Hamiota. Dwayne can’t get over what great shape it’s in, and can’t wait to try and make it run. Prior to that though, I finally caved and went with Peter’s (my girlfriend’s father) suggestion to not muck about with fancy fiberglass and boat paint, and just use a good exterior paint. I believe it was CIL brand oil based high gloss exterior paint. Laura picked out the interior colours. The cabin will be painted a sort of cornmeal yellow, and the cabinets will be stained a dark shade, similar to the shade of the laminate countertop. I went with Minwax Polyshades (I think that’s the correct name), which is a 2-in-1 stain and polyurethane treatment. I’ve never used anything like that before, but we’ll see how it goes.

Sunday was another slow day, but I got a bit more done. I started paint prep by getting the wood filler into all the holes on the exterior.
I also scored some windows from a friend of Dwaynes. I wanted to install some small windows that would slide or pop open, but I couldn’t find any. These are a very good compromise. They are hexagonal van windows (a la 1970’s shaggin wagon) about 13” across. When I got them they had a dice design on them (see above, and use your imagination because they were much more symmetrical looking than that) , but that was easily removed by spraying them with engine degreaser, scraping the paint off with the edge of a hose clamp (couldn’t find a razor), and then buffing with a powerball and some glass cleaner. I then installed these in the doors, centered, with the points heading front-to-back, and the flat sides top and bottom. The bottom edges are in line with the door handles.
I also put a ¼-round front lip on the cooler drawer with the round edge facing out.

Thursday, June 3, 2010

Death Star

If I were Darth Vader, I would be reporting to the Emperor, "This battle station is nearly operational."Today was day one of door-a-palooza. I got the passenger side door sorted out, and tomorrow I'll do the driver's side.

I was going to try to attach some aluminum L-molding to the edge of the doors to give them a lip to close against the wall, however when I started to anneal and bend it, it didn't take long before I had twisted it into a mess. So I went with plan B, which was to build a lip on the inside of the doorframe using plywood. I wanted 1/2" sticking out, so I made the necessary pieces 1 1/2" wide.

Building the piece to fit the curve was easier than I thought it would be, since it dawned on me that I wouldn't have to try to freehand trace a piece to fit. Instead I just made a new compass. I knew that the doors had a 19" radius curve, and that I wanted the piece to stick out 1/2", and have 1" behind the wall. So I made the holes in my new compass at 20" and 18 1/2", and then traced the curve on the corner of a sheet of plywood, and carried the cut down each side. I ended up with a piece that fit beautifully. If you click on the photo above, you can see the bottom edge. I forgot to snap a picture of the curved bit.

Next came the door latch. In the top photo you can see the interior handle with the latch itself, and in the second photo you can see the exterior handle with the keys hanging out. I couldn't find any decent deals locally for this type of door latches. It would have cost about $80 for all three doors if I had purchased the parts locally, so I ordered them from Vintek. They cost $77 with shipping.

The fact that all 3 doors are keyed the same was a major selling point. The set came with 6 keys, any one of which will open any door on the trailer. I just wish the set had come with rubber gaskets to put under the exterior handle. This isn't a big deal though, I found a piece of rad hose in Dwayne's garbage bin that I can cut some bits from to make gaskets.

Total cost to date:
------------------------------------
Prev Total: $596.22
------------------------------------
(1) Sheet 1/2" plywood - $20
(3) Door Latches - $77 (I'll count these now even though they're not all installed yet.
------------------------------------
Subt: $97
------------------------------------
TOTAL $693.22

Galley Drawers


Last night was another long, persnickity job: the galley drawers. I am by no means a master cabinetmaker, but I'm satisfied with the results. I wanted a 1/8" gap around each of the drawer faces, so I used scraps of masonite to shim the faces into place when I glued and screwed them onto the drawers.
I also installed spring-roller style latches inside the cabinet doors (in the wardrobe and the galley). While I was working on this I realized that the knobs I bought for the cabinets (the same as on the wardrobe doors) wouldn't leave space for the galley hatch to close. I then cursed loudly and began thinking of alternatives. There is a gap behind the drawer fronts on the right side (beside the cooler), so they can be opened from the side, if I don't feel like putting handles on them, but I will definitely need a handle on the left-hand cabinet door. If I'm going to do that, I may want to do the same to the drawers, just for uniformity's sake.
The simplest alternative is to cut holes in the fronts using the hole saw. The other idea I had was to use they style of handles that are hinged so they lay flat against the door when not in use (like the ring handles sometimes used on steamer trunks), or I could take one of those C-shaped bar handles that are sometimes used on cabinets, overbore the holes for it, and install it with large washers behind, so that it will sit flush with the door when not in use.
Total cost to date:
------------------------------------
Prev Total: $547.22
------------------------------------
(1) Sheet 1/2" plywood - $20
(3) sets of drawer slides - $17
Cabinet hardware - $12
------------------------------------
Subt: $49
------------------------------------
TOTAL $596.22

Tuesday, June 1, 2010

More Cabinetry

I carried on with the cabinetry today. I started with the face of the wardrobe, which I cut, test fitted, marked where I wanted holes for the drawer and doors, cut again, adjusted, then installed. I then made the cabinet doors. They were cut 3/4" outside the dimensions of the holes, simply because that was the hinge offset, and I wanted an even border all around for easy measuring. I still need to make a face for the drawer. I may wait until I can get at the router in the base woodshop to make a nice face, If I can't find something else suitable. Yes, I did notice the gap where the roof meets the cabinet. It's not a big deal, I'll be putting some moulding up there anyway.


I then installed the final panel of the wardrobe, which was the top rear panel. I installed it at an angle, and it was mitered on the bottom edge for a nicer appearance from the galley.
I then put in dividers under the galley counter, and attached a 1/2" plywood door to one side using a scrap bit of piano hinge that I had cut off the galley hatch hinge. The door was warped a bit, so I stuck a piece of 1/2" plywood in the door and screwed it closed in order to take the warp out of it.

I still haven't started another sheet of plywood, so the total cost is still $547.22