Monday, May 24, 2010

Discussion topics

Good Day Loyal Readers,

Now that I've got the comments enabled, here's a discussion topic for you all. I'm looking for some suggestions for a few up-coming bits of this trailer. I know I could just order the bits from the sites I'm linking here, but I'm looking for suggestions as to where I might source these parts locally (and preferably used/salvaged). I've asked the local RV dealers about these items. They can order in windows of any size for me (pricey), and the door latches they didn't know if they could get.

First, I'm looking for some door latches like this, or this. Since the doors will simply be the 3/4" ply pieces that I cut out, I need something that will mount well to them. You'll notice the handles pictured are the same kind most hardware stores sell for garage doors.
The inside latches, however, are very tricky to find, surprisingly. I like how they screw onto the inside face of the door, rather than mounting in a hole in the door, as is common in modern campers. I've seen these inside latches used in tractors, truck caps, and old campers, but have had no luck tracking any down that I can use in the teardrop.
Also, if any of you know where I might be able to find a set of handles like the ones pictured (or even 3 T-handles) that are all keyed the same, that would be very handy.

Second thing is windows. I'm looking for small windows that will mount in the doors (preferably), and that can either slide or crank open to let air flow through. the doors are 30" wide by 36"tall, so anything going there would have to be well inside those dimensions. Here are some examples: Slider, Crank, Flip-up boat window, maybe an old ext. cab truck window, who knows?

Any suggestions gratefully accepted, including different parts that might do the same job.

Cheers


Rear Hatch


Today I started the hatch door. To begin I traced out the rear curve on a paper template, which I used to make the first beam out of 1/2" plywood. I then used the first beam as a template for all the others. I cut 7 beams.

I then clamped all 7 together and sanded the edges so that they were even.

This is the frame. I doubled up the plywood on the outside beams, so they are 1" thick.


While I was working on the hatch frame, Dwayne started insulating the roof with polystyrene insulation. He had some 1" thick sheets of it left over from when he insulated his garage. Once I finished the hatch frame, he helped me test fit it and its hinge. It sits very nicely in the rear opening, and moves well too. It binds very slightly at the bottom corners when closing, but I should be able to solve that fairly easily with the sander.

Ella tried out the cabin. I think she approves.

Costs to date:

Last Total: $462.54
----------------------------

(1) Sheet of 1/2" ply - $20.99
2x2's - FREE (I ran out, so Dwayne donated a few 2x4's which we ripped to 2x2)
polystyrene insulation - FREE (also from Dwayne's stash)
----------------------------
Subt: $20.99
----------------------------
TOTAL: $483.53

I also noticed that so far there has been very little scrap accumulating from this project. Most of it has come from the hatch. I had to space the beams out about 1" from one another on the sheet of plywood, so there are a lot of crescent-shaped bits of plywood scrap. Still, there is probably less than half a trash bin of total scrap so far. I think this is a testament to just how economical the design really is.

Comments Enabled/Email Posting.

Hi Loyal Readers,

I figured out how to enable comments on the blog, so you can now leave comments at the bottom of the page, or click where it says "comments" to leave them.
I also discovered that I can email posts from my Blackberry (and thus, straight from the jobsite). So you'll now be kept more up-to-date than ever before.
Sent from my BlackBerry device on the Rogers Wireless Network

Sunday, May 23, 2010

Doors, More Framing, Headliner

I started off the day by marking and cutting out the doors. As you can see, I kept the same rounded profile as the generic benroy plans from the first post of this blog. The curve on the door is a 19"radius, the same as the front curve on the roof.

I'll answer the question before you ask it: Why yes, that is me cutting into a plywood wall using an angle grinder. I wanted something that would cut a narrow, linear hole to start the jigsaw blade. I'll be using the same pieces of plywood I cut out as the actual doors, so I didn't want any big round gouges in them to leak. The cutoff wheel on the angle grinder worked very well, despite making a lot of smoke.


Next on the docket was framing the roof vent I picked up this afternoon at Canadian Tire. This was fairly straightforward.


The plywood walls were warped a bit, and not sitting plum at the front. They also weren't as stiff as I would have liked, so I put in some diagonal braces. I had to give myself a refresher trigonometry lesson to get the angles right, but they fit like a glove. They also brought the whole thing back to plum, and made it stiff as hell.


I carried on with the remainder of the roof beams, and added a couple along the centreline running fore-aft.


As darkness fell, I enlisted the help of Nathan (Dwayne's son) and his friend. The extra hands were helpful jamming the masonite headliner into position. As it turned out, the top of the roof was about 47 15/16" rather than a full 48, so it was a very snug fit, and the masonite held itself up. screwing it to the roof beams proved to be a pain in the rectum, as the screws don't seem to have quite as broad a head on them as the masonite would prefer. Regardless, I got it in before Wayner called to invite me to go find a brand spanking new geocache with him.


Sorry about the poor quality photos of the headliner. It was dark, the camera flash wasn't cooperating, and I was in a hurry to go geocaching.

Tomorrow I plan to lay a good thick bead of glue between all the roof braces and the headliner, because the screws could potentially wear through the sheet.

The 4x8 sheet just happened to go all the way to the back of the cabin. Handy. It's almost like I'd planned it that way.


Costs to date:

Last Total: $376.50
----------------------------
(4) 2x2's - $4.54
(1) Sheet of Masonite - $10
Roof Vent - $54.50
Screws - $17.00 (this is about how many I'll use by the end of the project. I'm adding them in here so I don't forget)
----------------------------
Subt: $86.04
----------------------------
TOTAL: $462.54

Saturday, May 22, 2010

The Camper Begins


This Friday I got started on the camper pod! Exciting. Read on...


I started building the floor after being let off work early. My friend Wayne came and helped out for awhile. We glued and screwed 2x2 joists under the 3/4" plywood floor. I used the handy countersink bit above to drill the pilot holes. As you can see above, the glue was Weldbond (which I've never used before, but I hear it's pretty decent) and the screws are 1-1/4" deck screws.


Above is what the underside of the floor looks like.


Wayne and I traced and cut the walls that same afternoon. We used a compass made of a piece of the 2x2. I drove a screw through at one end so that about 1/8" of its point was sticking out, then drilled pencil-sized holes at 19" and 48" from the point. The front curve is the 19" radius and the back curve is 48" radius at the top and 19" radius at the bottom so that it meets the vertical rear nicely.


The two photos above were shot on Saturday back at Heavy Pedal. It was raining, so I brought the whole project there so that I could have a dry place to work on it. Not quite soon enough apparently, because the sheet of 1/2" ply that was on the top of the stack the previous night when the rain began had started to delaminate on one end. I'll use that sheet for cupboards in the galley, as only about 5 or 6 inches of it are ruined.

In the two photos above, the walls are clamped together because I had just taken the belt sander to the curves to even and smooth them out. I bought the sander and a 5 amp jigsaw with a laser at Canadian Tire on sale. They were both about 50% off. It turned out to be cheaper than renting them for the long weekend.


Next step was to fit the walls. I fit them to the sides of the floor to maximize both interior space and overall strength. They were glued and screwed in the same fashion as the floor, except that about every second screw was longer. Dwayne found some longer deck screws and invited me to use them just to be sure the walls were anchored guten'tight (like a German virgin) to the floor. I then installed two spars across the top to steady the works. I didn't put any more in yet, because I wanted to keep as much space clear as possible while I decided on the measurements for the cupboards in the galley.

After taking a short break to go for a nice drive (see below), I installed the lower bulkhead. I became a yardstick for this step, using my own length to determine the amount of galley space I could have. I laid on the floor and stretched out to see how far aft I would need to go with the bulkhead.


The one feature I really wanted to have in the galley is a drawer for a cooler to sit on under the counter, so that the cooler can be pulled out and opened, then re-stowed easily. Since I'm very tall, this was a challenge to incorporate into the plan (see above paragraph about the lower bulkhead). Luckily Dwayne and Tasha were nice enough to donate this great antique Coleman cooler to the cause. It's narrower and taller than most coolers, so it fit the bill perfectly. Plus it dates nearly back to the heyday of this type of camper, so I think it's a great addition.

Costs to date:

Last Total: $260
(I'm not counting the box sides since they have nothing to do with the camper)
------------------------------

(3) 3/4" plywood sheets - $89.97
(6) 2x2's - $13.62
(1) Weldbond Glue - $10.41
(1/2lb) Deck Screws - $ 2.50
------------------------------
Subt: $116.50
------------------------------
TOTAL: 376.50


Bonus
This is what kept me from the trailer all afternoon. I don't regret it one bit. Dwayne and I were feeling a bit mischievous with all the rain coming down, so we figured it was a fine time to fire up the Eagle and take 'er down to the clay pits for some muddin'


:-0

Wednesday, May 19, 2010

Day Off (-ish)

Well, I think this is the first day since the project started that I haven't done any actual work on it. I did, however, go pick up most of the lumber that will become the camper pod. This consisted of 4lbs of deck screws, some Weldbond glue (I was going to use Gorilla Glue, and still might, but I'll have to go to Canadian Tire or Home Depot for it), some 3/4" Plywood, some 1/2" plywood, some 2x4's which I had ripped to 2x2's, and some sheets of 1/8" masonite.
Yes, I'm going old-school and using masonite to make the curved roof just like they did back in the 30's-50's. Now I know what you're going to say: "That's a dumb idea, that s***'ll rot out so fast it'd make your head spin." Well, no worries, this was well thought out...

1. Plywood contains glues that are water soluble (to varying extents, based on the quality of the plywood). Masonite is just wood fibers that are formed into sheets by applying huge amounts of pressure. This causes the natural resins in the wood to bind it together with properties similar to solid wood. This leads me to believe that masonite would weather fairly well.

2. Since plywood bends along the short side, rather than the long, using 1/8" plywood would mean that a great deal of it would go to waste. I can bend the masonite sheets lengthwise, so there will be very little waste.

3. The masonite sheets cost me about $10 each. 1/8" birch plywood would have cost around $30 per sheet (and don't forget, as above, I would have needed more of them).

4. I priced out some epoxy boat-hull paint/sealant. It goes for $55/quart. Yes, this is pretty pricey, but it's the stuff that people use to seal the hulls of super-light kayaks and surfboards they build out of bloody balsa and foam. I'm confident it'll do just what I need it to.

5. If it was good enough for the old timers who started the original teardrop trailer craze, it's good enough for me.

6. If my roof starts to leak or rot out, I can easily tear it off and build a new one next season if necessary.

I'm sure some of you still think I'm being silly using "inferior materials" but that's the joy of building things yourself. You get to ignore what everyone else wants and do your own thing.

Also, I've started corresponding with Vintek RV Parts. They specialize in parts for teardrop trailers. I'll be buying a galley hinge, a set of door/hatch latches keyed alike, and a set of 21x14" windows from them.

Once I get all of the supplies I've mentioned above (including lumber, hardware, boat paint, and RV parts) the total bill for the trailer will be somewhere in the $850 range. I'll add it more precisely as I build, since I'm not going to count any extra bits that I don't end up using. There are still a few things I'll need that aren't on this list, like insulation, paint for inside the cabin and galley, some kind of a countertop, cabinet hinges, knobs, etc. I'm still confident that I'll be able to stick with the $1000 budget, but it's not my top priority. My top priority is creating a decent quality mini-RV that I'll be able to enjoy a lot of use of.

Now hopefully I can get into the wood shop to drop off this load of lumber, and get to work on it.

Tuesday, May 18, 2010

Box Sides


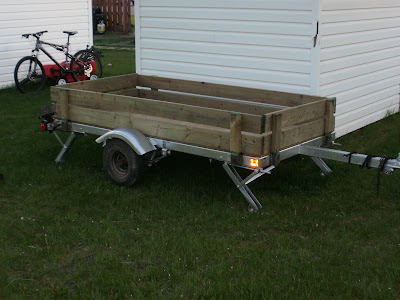
Yesterday and today I slapped together the box sides for the trailer. I started by building the sides themselves at home. The photo above is the first one test fitted. I couldn't find any neighbours to borrow a power saw from, so I used my trusty Stanley FatMax handsaw, which cuts very quickly and easily (and also has a 90/45 degree beveled handle so it can be used as a square).

I then went to Heavy Pedal Ranch while everyone was away at school/work and started cutting and welding on the pieces of box beam for the stake pockets. I initially welded just the two sides of each, but Dwayne came home and suggested I weld across the top to keep moisture out from between the pieces, so they wouldn't start to rust out as quickly. As you can see, my welding doesn't suck quite as bad is it did.

After work today, the base Wood Hobby Club decided to have an open house in conjunction with the reopening of the auto club. I used this opportunity to buy a membership and rip the bottom ends of the stakes to they'd fit in the pockets, since the box beam wasn't big enough to accept a full 2x4. I unscrewed all the planks, ripped the 2x4's with the bandsaw, and reassembled the pieces. The vice-prez of the wood club happened to have some exterior wood treatment, and gave me some to treat the cut ends of the planks, so they should stay nice and rot-free for a good long while.

After this photo was taken I also painted the stake pockets and a few spots that I cleaned up with the grinder where I cut off bits of the original frame.

I'm not sure what colour I want to paint the wood bits yet. I'm thinking maybe forest green? Send me your suggestions. What do you think would look good over the silver frame? Possibly just some clear varnish?


And once again I've gone and lost the reciept. Here's my close estimation..

Last total: $260
--------------------
2 10 foot 2x4's - $2.50 ea
6 8 foot 1x6's - $3.00 ea
-------------------
Subt: $23
-------------------
Total: $283 (though I'm not sure if this lumber really counts since it's not actually part of the camper)

And a bonus for those of you who really have nothing better to look at...

This was my Sunday project. My headlights were very badly faded, and this was irritating me to no end, so I picked up a 3M Headlight Lens Restoration Kit from Canadian Tire, and it worked wonders. One of the guys at work noticed and thought I had installed brand new headlights. This picture doesn't actually show the full effect of the kit. After I did the drivers side light the first time, it was still a bit cloudy. I reread the instructions and saw where it stressed the importance of rough sanding until seeing an even frosted look over the whole lens, which I hadn't done. I redid the light before moving on to the second one and it looked brand new. I wish I had remembered to take another photo. If any of you really want one, I can snap another pic later.